Table of Contents
ToggleIntroduction
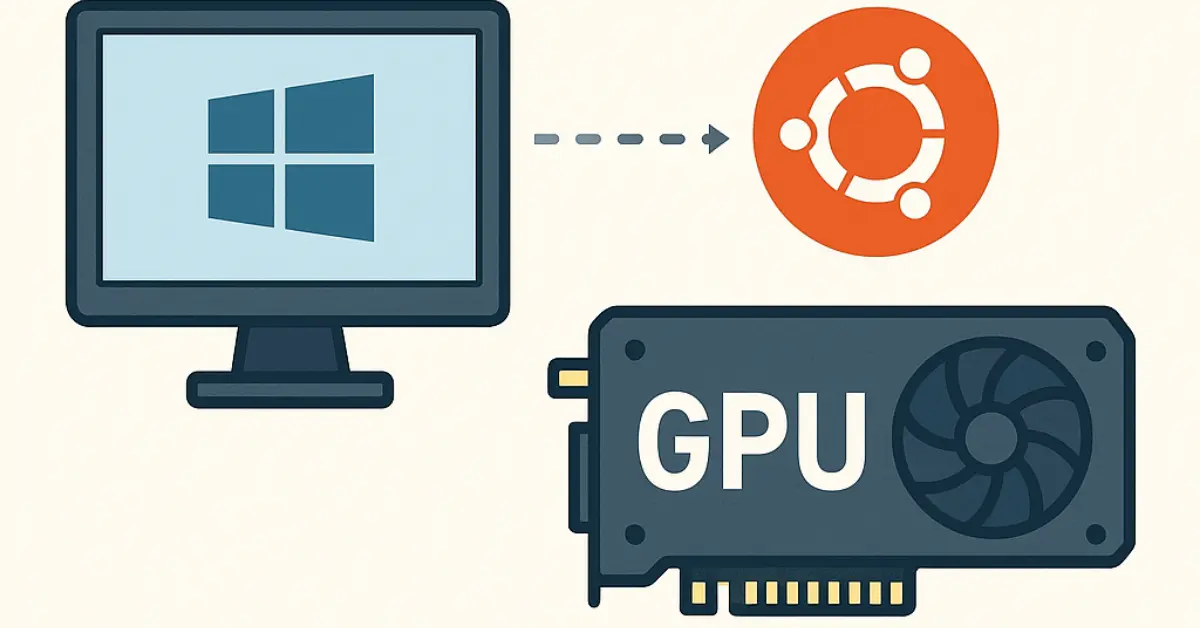
GPU acceleration on Windows with WSL2 can turn a slow training job into one that finishes in minutes. In this guide, you’ll set up GPU‑powered TensorFlow inside Ubuntu on Windows—no manual CUDA or cuDNN installs—then verify everything with a quick CPU vs GPU test. Don’t worry if these terms are new; we’ll explain each step clearly.
By the end, you will:
- Install WSL2 and Ubuntu on Windows
- Set up Python in a safe virtual environment
- Install TensorFlow with built‑in GPU support
- Verify that your NVIDIA GPU is detected and ready
- Launch Jupyter Notebook and confirm GPU acceleration
- Run a simple benchmark to compare CPU and GPU performance
Why GPU Acceleration on Windows with WSL2 Matters
The Problem: Why CPUs Fall Short
CPUs are powerful, but they handle tasks one (or a few) at a time, like having a master craftsman doing complex work, one piece after another. For AI, where millions of operations repeat, this becomes painfully slow. Benchmarks often show GPUs running deep-learning workloads 10×–70× faster than CPUs (depending on model, GPU, and batch size).
How CPUs & GPUs Work
A CPU has a handful of high-speed cores for complex, varied tasks, like a smart multitasker. It’s great for logic and control but not for repeating the same calculation thousands of times.
A GPU has thousands of smaller, simpler cores designed for doing the same task across many data points, like directing an army of helpers doing identical jobs in parallel. That’s why they’re ideal for deep learning, rendering, and simulations.
A Brief History of GPUs in AI
- Pre-2010: GPUs were mainly for graphics, gaming, and 3D rendering.
- 2010: NVIDIA’s Bill Dally showed that updating an AI model to detect cats from YouTube could be done with just 12 GPUs rather than thousands of CPUs.
- 2012: AlexNet (an architecture developed for image classification tasks with 60 million parameters) used GPUs (two GTX 580s) to win ImageNet dramatically, proving deep learning’s potential and kickstarting its explosive growth — AlexNet Wikipedia.
- Before that: Early studies had already shown massive speedups, one reported training a deep belief network 70× faster on 30 GeForce GTX 280 GPUs than on CPUs — Deep Learning Wikipedia.

Installation Prerequisites
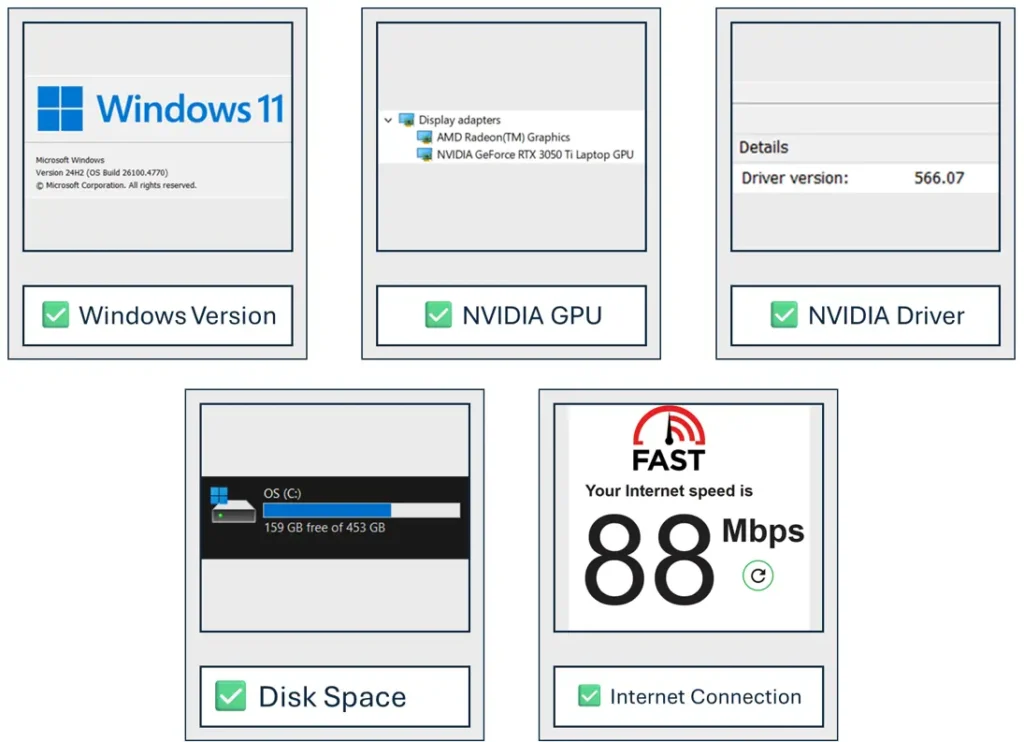
Important: All of the requirements below are mandatory. If your system does not meet them, GPU acceleration will not work, and you may need to upgrade your hardware or operating system before continuing.
The next subsections will show you how to check if these requirements are met or not — we’ll check each one and explain what to do if you don’t meet it.
Note: This guide follows the official TensorFlow pip installation instructions (including the GPU support and WSL2 sections) to ensure compatibility with current releases.
Before setting up GPU acceleration, let’s go through each requirement one by one. For every requirement, we’ll explain how to check it, what’s needed, and what to do if your system doesn’t meet it.
Windows Version
How to Check
- Press Windows + R on your keyboard, type
winver, and press Enter.
A small window will appear showing your Windows version and build number.
What You Need
- Windows 10: Version 21H2 (Build 19044) or later
- Windows 11: Any supported build (e.g., 21H2, 22H2, 23H2, 24H2)
If You Don’t Meet the Requirement
- Go to Settings → Windows Update → check for updates and install all available updates.
- If your device cannot be updated to at least Windows 10 version 21H2, you cannot proceed with this guide.
NVIDIA GPU
This guide only works with NVIDIA GPUs, as TensorFlow’s WSL2 GPU support is designed for them. Other brands like AMD or Intel GPUs require different setup processes, which we don’t cover here.
How to Check
- Press Windows + X and select Device Manager.
- Expand Display adapters.
- Look for your NVIDIA GPU model (e.g., NVIDIA GeForce RTX 3050 Ti).
What You Need
- NVIDIA GTX 10-series, RTX series, or newer
- Minimum 4 GB VRAM recommended for deep learning tasks
How to Check VRAM
- Press Windows + R, type
dxdiag, and press Enter. - Go to the Display tab.
- Look for Display Memory (VRAM).
If You Don’t Meet the Requirement
- Without an NVIDIA GPU, this guide won’t work — GPU acceleration in TensorFlow on Windows/WSL2 requires NVIDIA hardware.
- If your GPU is too old or has less than 4 GB VRAM, you may still run the setup, but performance will be limited, and large models may fail due to memory errors.
NVIDIA Windows Driver with WSL2 CUDA Support
The NVIDIA Windows driver with WSL2 CUDA support acts like a translator between Windows and Linux, allowing your GPU to be accessed directly from WSL2. Without it, TensorFlow in WSL2 can’t use your GPU for acceleration.
How to Check
- Right-click your desktop and select NVIDIA Control Panel.
- In the bottom-left corner, click System Information.
- Look for Driver Version.
What You Need
- Driver version 528.33 or newer for WSL2 CUDA support.
If You Don’t Meet the Requirement
- Go to the NVIDIA Driver Download page.
- Select your Product Type, Series, Model, Windows version, and Language.
- Click Find and download the NVIDIA Studio Driver (recommended for AI and machine learning due to stability).
- If you also use the same PC for gaming, you can choose the GeForce Game Ready Driver, which is optimized for games but still works for AI.
- Run the downloaded installer, follow the prompts, and restart your PC.
Basic System Readiness
Before installing anything, make sure your system has enough resources and that you can run basic commands in both Windows and Ubuntu.
How to Check
Internet Connection:
- Open a browser and visit a website like fast.com to ensure you have a stable connection.
- Speed is less important than stability — expect 2–3 GB of downloads.
Disk Space:
- Press Windows + E to open File Explorer.
- Go to This PC and check that your system drive (usually C:) has at least 10 GB free.
Command-Line Access:
- Open PowerShell or Command Prompt in Windows.
- Open the Ubuntu terminal (once installed in the coming Section).
What You Need
- Stable internet connection
- At least 10 GB free disk space
- Ability to run basic commands in Windows and Ubuntu
If You Don’t Meet the Requirement
- Free up disk space or connect to a more stable network before proceeding.
- If you’re new to command-line tools, don’t worry — this guide explains every command you’ll need.

Setting Up WSL2, Ubuntu, Python, and Jupyter Notebook
In this section, we’ll install and configure all the essential tools needed to run TensorFlow with GPU acceleration inside WSL2.
By the end, you will have:
- WSL2 enabled and ready on your Windows system.
- The latest Ubuntu LTS running inside WSL2.
- Python installed and configured within Ubuntu.
- Jupyter Notebook ready for interactive development.
- TensorFlow with GPU support installed and verified.
We’ll go step-by-step, starting with enabling WSL2 on Windows.
Install Windows Subsystem for Linux 2 (WSL2)
Enable WSL2 on Windows to run a Linux environment without a virtual machine.
Open PowerShell as Administrator.
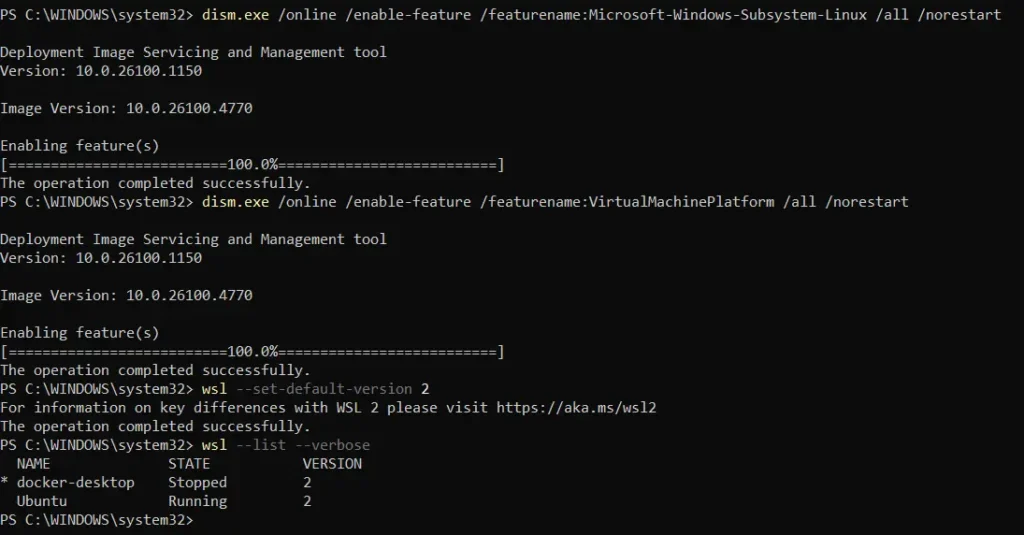
Enable required features:
dism.exe /online /enable-feature /featurename:Microsoft-Windows-Subsystem-Linux /all /norestartdism.exe /online /enable-feature /featurename:VirtualMachinePlatform /all /norestartSet WSL 2 as default:
wsl --set-default-version 2Restart your PC.
Confirm in PowerShell:
wsl --list --verboseIf no distributions are listed, that’s fine — we’ll install Ubuntu next.
Default Version should be 2.

Install Ubuntu Linux Distribution
With WSL2 enabled, install the latest Ubuntu LTS to use as your Linux environment.
Open Microsoft Store, search for Ubuntu, and install the latest LTS version (e.g., Ubuntu 22.04 LTS).
Launch Ubuntu from the Start Menu, set your username and password.
Verify installation in the Ubuntu terminal:
Type:lsb_release -aand press Enter — it should show Ubuntu 22.04 LTS or newer.

Install Python in Ubuntu
We’ll install Python inside Ubuntu to run TensorFlow and Jupyter Notebook.
In the Ubuntu terminal, update packages:
sudo apt update && sudo apt upgrade -yInstall Python, pip, and venv:
sudo apt install python3 python3-pip python3-venv -yVerify installation:
python3 --version— should show Python 3.12 or similar.
Install Jupyter Notebook
We’ll install Jupyter Notebook in a Python virtual environment inside Ubuntu for interactive development.
In the Ubuntu terminal, create a virtual environment (replace
jupyter-envwith any name you like):python3 -m venv jupyter-envActivate the environment:
source jupyter-env/bin/activateInstall Jupyter Notebook:
pip install notebookLaunch Jupyter Notebook:
jupyter notebookCopy the URL shown in the terminal into your Windows browser to access Jupyter.
Install TensorFlow
With Python set up inside Ubuntu, you can now install TensorFlow to enable GPU acceleration on Windows with WSL2.
Run the following commands inside your Python virtual environment:
pip install --upgrade pip
pip install tensorflow
This installs the latest TensorFlow build with GPU acceleration for WSL2 — no manual CUDA or cuDNN setup required.
To confirm it’s installed correctly, run:
python -c "import tensorflow as tf; print(tf.__version__)"
You should see the TensorFlow version printed without errors.
💡 Tip: If you see warnings about missing GPU drivers, make sure your NVIDIA driver on Windows is the latest WSL2 CUDA version.
GPU Verification & CPU vs GPU Benchmark
Verify GPU Availability in TensorFlow
In Ubuntu, activate your Python environment:
source jupyter-env/bin/activateStart Python:
pythonRun:
import tensorflow as tf
print("GPUs Available:", tf.config.list_physical_devices('GPU'))
4. If you see something like [PhysicalDevice(name='/physical_device:GPU:0', ...)], your GPU is ready.
CPU vs GPU Benchmark Test
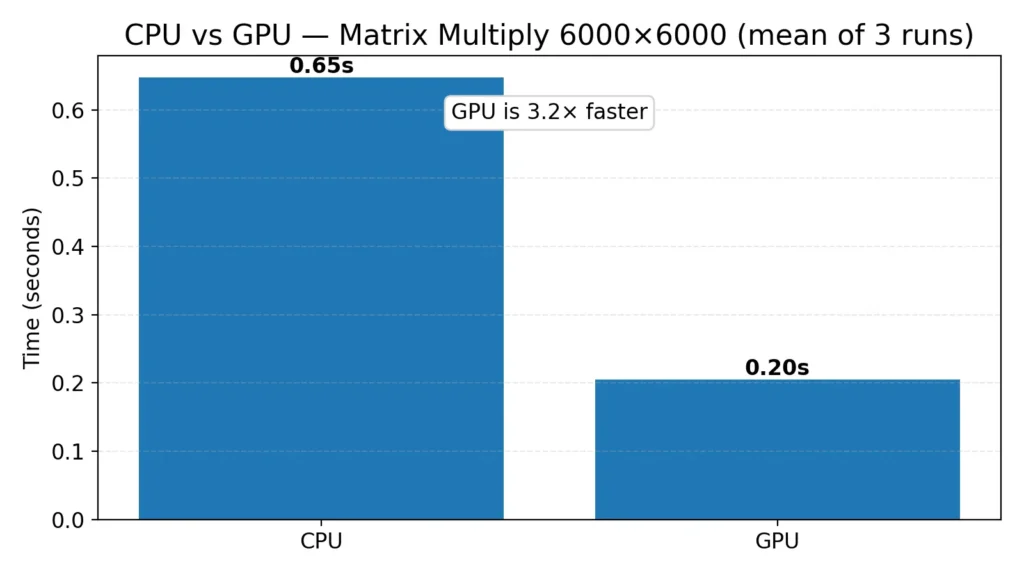
We’ll run a simple matrix multiplication on both CPU and GPU to compare performance.
In Ubuntu, activate your environment:
source jupyter-env/bin/activateStart Jupyter Notebook:
jupyter notebookCopy the URL from the terminal (e.g.,
http://localhost:8888/?token=...) into your Windows browser.In Jupyter, create a new Python 3 notebook and paste the benchmark code below.
Note: You may see TensorFlow warnings — they can be ignored for this test.
import os, time, tensorflow as tf

os.environ["TF_CPP_MIN_LOG_LEVEL"] = "2"

# Allow GPU memory growth
for gpu in tf.config.list_physical_devices('GPU'):
    tf.config.experimental.set_memory_growth(gpu, True)

def bench(device, size=8000, runs=3):
    with tf.device(device):
        a = tf.random.normal([size, size])
        b = tf.random.normal([size, size])
        _ = tf.matmul(a, b).numpy()  # Warm-up
        times = []
        for _ in range(runs):
            t0 = time.time()
            _ = tf.matmul(a, b).numpy()
            times.append(time.time() - t0)
    return sum(times) / len(times)

SIZE = 8000
cpu_time = bench('/CPU:0', SIZE)
gpu_time = bench('/GPU:0', SIZE)

print(f"CPU: {cpu_time:.2f} seconds")
print(f"GPU: {gpu_time:.2f} seconds")
print(f"GPU is {cpu_time/gpu_time:.1f}× faster")
Example Output:
CPU: 1.77 seconds
GPU: 0.38 seconds
GPU is 4.7× faster
Note: Your results may differ depending on your CPU, GPU model, and available system resources. Larger models or workloads will often show an even bigger speedup.
Conclusion & Key Takeaways
GPU acceleration on Windows with WSL2 lets you run Linux-based deep learning tools with full GPU power — without dual-booting or complex driver setups. Installing Python, Jupyter Notebook, and TensorFlow inside WSL2 ensures a clean, isolated environment for experiments. Our benchmark test showed the GPU running 4.7× faster than the CPU for large matrix operations. The GPU advantage grows with larger workloads and deep learning model training, making GPU acceleration on Windows with WSL2 essential for heavy AI/ML tasks.
Want to Learn More or Have Questions?
📩 For any inquiries, contact me here.
📚 Explore more tutorials and guides in the Blog section.


