Introduction
Every time you ask an AI tool to analyze your data, it leaves your computer and travels to the cloud. That might seem fine at first, but those files can include internal reports, client records, or other sensitive information.
Now imagine having the same AI capability without sending a single file anywhere. With PandasAI and Ollama, you can build your own local AI data analyst that runs completely offline. No API keys, no cloud uploads, only fast and private analysis powered by open-source tools.
In this guide, you will set up a complete offline workflow that connects PandasAI and Ollama together, all running on your laptop. It is simple, private, and works with any dataset.
By the end, you will:
- Install and configure Ollama to run local models like Llama 3.1 or Mistral
- Connect PandasAI to your local model for secure, natural language data analysis
- Build a lightweight Streamlit app to upload and explore your data interactively
- Test the system with your own CSV or Excel files, no internet required
Don’t worry if these tools are new to you. We’ll go through each one step by step and you’ll see exactly how they work together by the end.
Why Run AI Locally
As data professionals, we know how much AI can enhance productivity, uncover insights that humans might miss, and even automate parts of the analysis process. Tools like Excel, Python pandas, and Power BI already make analysis easier, but AI takes it further.
The challenge is that using powerful AI models often means sending your data to third-party servers through cloud services or APIs. In many organizations, that’s a security concern, and in some, it’s completely restricted.
Running AI locally with PandasAI and Ollama solves this problem. It lets you use advanced models while keeping full control of your data and workflow. Here’s what it offers:
- Privacy: Your data stays offline and is processed only on your computer.
- Speed: No latency or service delays from remote APIs or servers.
- Freedom: You decide how to prompt, which models to use, and when to run them.
- Reliability: The system is always available, unaffected by internet or service outages.
- Customization: Local tools can be easily adapted and extended to fit your exact needs.
Local AI may not always match the massive power of cloud systems, but it offers more than enough intelligence for everyday analysis while keeping your data fully private and under your control.
Step-by-Step Plan to Build with PandasAI and Ollama
To create your private AI data analyst, we will follow these main steps:

- Install Ollama – the local engine that runs language models directly on your computer
- Pull a Model – download a model such as Llama 3.1 or Mistral for your analysis tasks
- Install PandasAI – the library that allows you to query and explore data using natural language
- Connect PandasAI with Your Local Model – combine them to perform offline, secure data analysis
- Build the Streamlit App – design a simple web interface to upload and interact with your data
- View the Output – test your setup with a sample dataset and see the results in action
In the next sections, we will go through each of these steps in detail and set up the full workflow from installation to testing.
Step 1 Install Ollama
Before You Install
Large Language Models (LLMs) are neural networks trained on massive datasets with billions of learned weights. When you see a model described as 120B, it means it contains about 120 billion weights. Running such models locally (a process called inference) means using these weights to predict the next word, which involves billions of matrix multiplications for every generated sentence. Running such models locally means your computer must know how to load and process all these weights efficiently.
Ollama is a free, open-source tool that makes this process possible on regular computers. It handles setup, resource allocation, and runs models like Llama 3.1 or Mistral directly on your device.
One of its main advantages is quantization, which slightly reduces the precision of the model’s numbers to save memory and improve speed.
A simplified view of what happens during quantization:
Before quantization:
After quantization:
The math stays the same, but the smaller numbers make computations faster. Applied across billions of weights, this small optimization allows large models to run smoothly on everyday machines with only minimal loss in precision.
Installing Ollama
Ollama works on Windows, macOS, and Linux, but in this guide, we’ll focus on the Windows setup.
- Go to the official Ollama website.
- Download the Windows installer.
- Run the setup file and follow the default installation steps.
Once the installation is complete, Ollama starts running automatically in the background.
To confirm it’s installed, open PowerShell and type:
ollama --versionIf the version number appears, everything is set up correctly and ready for the next step.

Step 2 Pull a Model
Choosing the Right Model
Now that Ollama is installed, the next step is to download a language model for your local AI analysis but before downloading anything, you’ll need to decide which language model fits your computer best. Ollama supports many models, each with different sizes and performance needs. You can browse them all on the Ollama Model Library, it’s a good place to compare models before picking one.
The main thing to look at is model size, which is tied to the number of parameters (you’ll often see 7B, 8B, or 20B). The larger the number, the smarter the model, but it also needs more GPU and RAM to run smoothly.
Here’s a quick overview of popular options:
| Model | Parameters | Size (approx.) | Recommended GPU | Ideal Use |
|---|---|---|---|---|
| Llama 3.1 | 8B | ~4.7 GB | ≥ 4 GB VRAM | Balanced reasoning and analysis |
| Mistral | 7B | ~4.2 GB | ≥ 4 GB VRAM | Fast responses, lighter compute |
| Gemma 3:4B | 4B | ~2.3 GB | ≥ 2 GB VRAM | Lightweight chat or exploration |
| Phi 3:Mini | 3.8B | ~2 GB | ≥ 2 GB VRAM | Simple data summaries |
| GPT-OSS 20B | 20B | ~10 GB | ≥ 8 GB VRAM | Complex reasoning |
| GPT-OSS 120B | 120B | ~60 GB | ≥ 24 GB VRAM | Research-grade workloads |
On my setup with an RTX 3050 Ti (4 GB GPU) and 16 GB RAM, both Llama 3.1 and Mistral work smoothly. Mistral tends to respond a bit faster, while Llama 3.1 is slightly better at structured reasoning.
From experience, the model’s storage size usually gives a good hint about how much GPU memory it needs to run efficiently. For example, Llama 3.1 with a size of about 4.7 GB runs well on a 4 GB GPU, Phi 3 Mini with 2 GB fits comfortably on 2 GB GPUs, and GPT-OSS 20B with around 10 GB benefits from 8 GB or more. It is not an exact rule, but it serves as a practical guide when choosing a model that matches your hardware.
To learn more about why GPUs are essential for AI work and to compare CPU vs GPU performance, check this post
Pulling the Model with Ollama
Once you’ve chosen your model, open PowerShell and type:
ollama pull llama3.1Ollama will automatically handle the download, setup, and quantization, meaning it optimizes the model to run efficiently on your hardware without extra configuration.
When the download finishes, test it with:
ollama run llama3.1If it replies to your prompt (try “Hello”), it’s working.
You now have a fully functional local AI model running entirely offline; no internet, no cloud APIs, and full data privacy.
Note: When you run a model such as Llama 3.1, you might notice a rise in GPU utilization and memory usage. That’s normal and indicates the model is using your GPU for inference. The load will vary depending on the model size and prompt length, and it will drop again once the model stops running.

Step 3 Install PandasAI
Now that your local LLM is running smoothly, the next step is to make it useful for real data. So far, we have only interacted with the model through text, but what if you could ask questions about your own dataset, like a CSV or Excel file, in plain English?
In another post, we trained a model to convert plain-English requests into accurate Excel formulas.
That is what PandasAI does. It lets you talk to your data naturally, translates your question into pandas code, executes it, and gives you the answer, all on your computer, fully offline.
Imagine asking: “Show me the total sales per region.”
PandasAI would internally turn that into something like
df.groupby("Region")["Sales"].sum()
and then display the result, with no need to write the code yourself.
Setting Up PandasAI
From my testing, PandasAI worked best with Python 3.9, though newer versions may also work depending on the library version you install. If you already have Python 3.11 or newer, you can try it first. If no conflicts appear, that is even better. In my case, 3.9 was the most stable setup, so I will use it here as an example.
You can download Python 3.9 from the official site
https://www.python.org/downloads/release/python-3913/
Once installed, create a new project folder, open PowerShell, navigate to that folder, and type
python -m venv pandasai
.\pandasai\Scripts\activate
Then install PandasAI and its dependencies
pip install pandasai
pip install numpy==1.24.4
pip install pandas==1.5.3
You can confirm everything is installed correctly by checking the versions
pip show pandasai pandas numpyNote: These specific versions worked for me. You can experiment with newer releases of Python, Pandas, or NumPy if you prefer. Newer versions are generally better optimized, but if you run into compatibility issues, this setup will still work smoothly.

Step 4 Connect PandasAI with Your Local Model
Now that PandasAI is installed and your local LLM (like Llama 3.1 or Mistral) is running through Ollama, it’s time to make them work together. This is where the real power of PandasAI and Ollama comes alive; combining natural-language understanding from your model with the data analysis capabilities of pandas.
To make sure Ollama is running before executing this step, open PowerShell and type:
ollama listYou should see something like this:
NAME                       ID              SIZE
phi3:mini                  4f2222927938    2.2 GB
mistral:latest             6577803aa9a0    4.4 GB
llama3.1:latest            46e0c10c039e    4.9 GB
llama3.1:8b                46e0c10c039e    4.9 GB
nomic-embed-text:latest    0a109f422b47    274 MB
The connection is simple. PandasAI uses a built-in class called LocalLLM that lets you connect to any locally running model.
Here is the code to do that:
#Using PandasAI and Ollama together for local data analysis
from pandasai.llm.local_llm import LocalLLM
from pandasai import SmartDataframe
import pandas as pd

model = LocalLLM(
    api_base="http://localhost:11434/v1",
    model="llama3.1"
)

data = pd.read_csv("Sales Data.csv")

df = SmartDataframe(data, config={"llm": model, "enable_cache": False})

df.chat("Show me total sales per region")
This small script does three main things
- Connects PandasAI to your local model through Ollama
- Loads your dataset from a CSV file ( ensure you Sales Data.csv file in the same project folder)
- Sends your question to the model, which translates it into pandas code, runs it locally, and returns the result
If everything is set up correctly, you will see the output directly in your terminal or notebook.
>>> from pandasai.llm.local_llm import LocalLLM
>>> from pandasai import SmartDataframe
>>> import pandas as pd
>>> model = LocalLLM(
...     api_base="http://localhost:11434/v1",
...     model="llama3.1"
... )
>>> data = pd.read_csv("Sales Data.csv")
>>> df = SmartDataframe(data, config={"llm": model, "enable_cache": False})
>>> df.chat("Show me total sales per region")
  Region  Total_Units_Sold  Total_Revenue
0   East               610          72044
1  North               508          57950
2  South               658          59997
3   West               764          73094
Note:
The addresshttp://localhost:11434/v1is how PandasAI communicates with your local Ollama instance.localhostrefers to your own machine, and11434is the default port Ollama uses.

Step 5 Build the Streamlit App
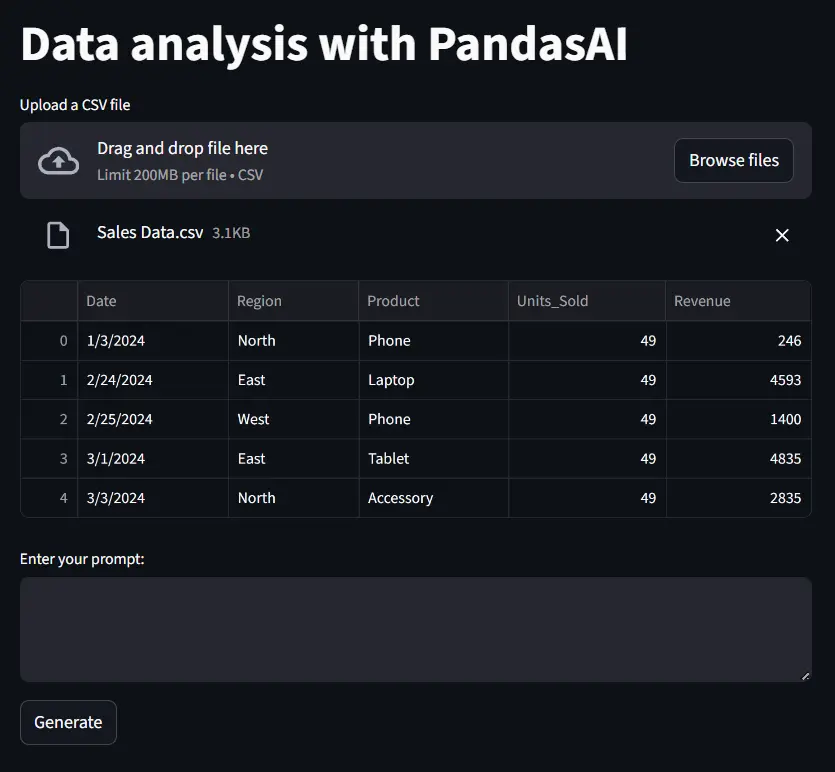
Now that your private AI data analyst is fully working, congratulations, you’ve successfully built a completely offline, local AI data assistant. To make it even easier to use, let’s wrap everything inside a simple web app using Streamlit.
Streamlit is an open-source Python framework that turns scripts into interactive web apps. It’s perfect for quick dashboards, machine learning demos, or AI interfaces without needing any web development skills.
Here’s the code to create a basic app that integrates PandasAI with your local LLM model:
# Streamlit demo: Build a private AI data analyst using PandasAI and Ollama
from pandasai.llm.local_llm import LocalLLM
import streamlit as st
import pandas as pd
from pandasai import SmartDataframe

model = LocalLLM(
    api_base="http://localhost:11434/v1",
    model="llama3.1"
)

st.title("Data Analysis with PandasAI")

uploaded_file = st.file_uploader("Upload a CSV file", type=['csv'])

if uploaded_file is not None:
    data = pd.read_csv(uploaded_file)
    st.write(data.head(5))

    df = SmartDataframe(data, config={"llm": model, "enable_cache": False, "save_charts": False, "save_logs": False})

    prompt = st.text_area("Enter your prompt:")

    if st.button("Generate"):
        if prompt:
            with st.spinner("Generating response..."):
                st.write(df.chat(prompt))
Save the file as app.py inside your project folder. Then open PowerShell, navigate to your project directory, activate your virtual environment, and run:
streamlit run app.pyThis will open a new browser tab with your local AI data analyst interface.
You can now upload your CSV file, ask questions in natural language, and get instant results, all processed locally by PandasAI and Ollama.

Step 6 View the Output
Once your Streamlit app is running, a new browser tab will open with your private AI data analyst ready to use.
Upload a CSV file, preview the data, then type a question in plain English, for example:
“Show me total sales per region”
“Show total revenue for each product type as a pie chart”
“How many regions in the dataset”
Note: At first, I tried the prompt “Plot pie chart for the total revenue for each product type” but it returned an error. When I rephrased it to “Show total revenue for each product type as a pie chart” it worked perfectly and generated the chart above.
Sometimes, small wording changes make a big difference. If a prompt doesn’t work, try rephrasing it, the model’s ability to interpret instructions depends on its reasoning power and the way the question is phrased.
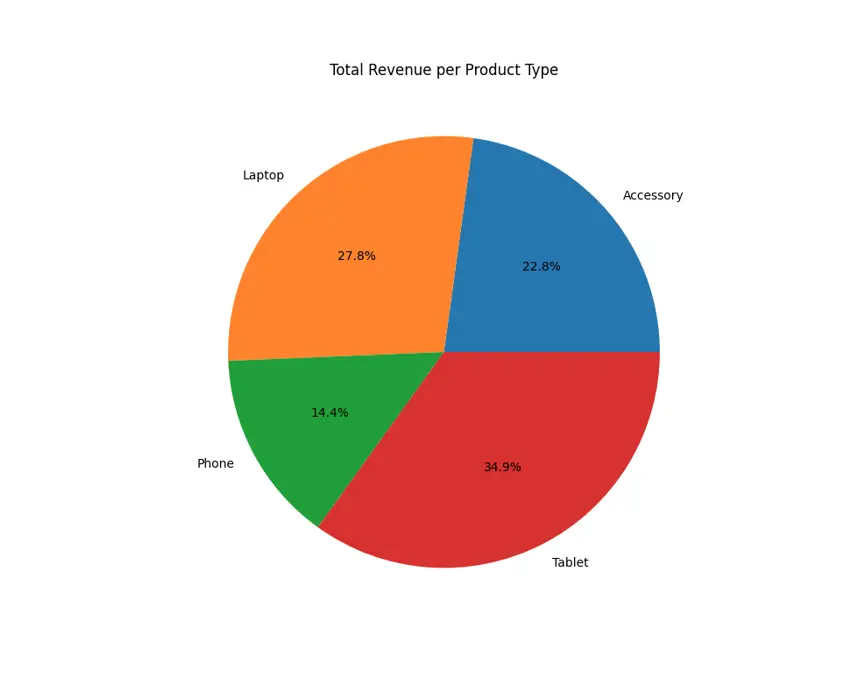
PandasAI sends your question to your local Ollama model, which understand it, writes the pandas code, and runs the analysis, all locally, with no cloud connection.
However, keep in mind that results depend on the reasoning ability and size of the model you’re using.
Sometimes, you may see a message such as:
“Unfortunately, I was not able to answer your question, because of the following error:
No result returned.”
This usually means the model couldn’t interpret the query or generate valid code. Using a more capable model often improves accuracy, though it also requires more GPU power, as discussed earlier in this post.
Even with those limits, you now have a working local AI analyst that can understand your language, explore your data, and preserve your privacy.

Credit: This implementation was adapted and extended from Evren Ozkip’s PandasAI tutorial. I learned the integration between PandasAI and Ollama from his GitHub repository, then customized and optimized it with additional configuration options.
Conclusion and Next Steps
You’ve now built your own Private AI Data Analyst using PandasAI and Ollama, running entirely on your machine.
Your data stays secure, no API calls, no cloud uploads, and full control over how analysis happens.
You can now:
- Ask questions about your CSV or Excel data using plain English
- Generate summaries, insights, and charts directly through Streamlit
- Work completely offline with full privacy
If you want to explore further:
- Try more advanced models from Ollama’s model library
- Experiment with larger datasets or connect PandasAI to SQL or Excel data
- Deploy your Streamlit app on an internal network for team use
Final takeaway:
Running AI locally gives you privacy, control, and independence while still offering powerful analysis. You now have the foundation for secure, offline data intelligence using open-source tools.
Frequently Asked Questions
What are the disadvantages of Ollama?
Ollama runs AI models locally on your device, keeping your data completely private. However, its performance depends on your hardware. Running advanced or larger models, such as OpenAI’s open model GPT-OSS 120B, can require up to 24 GB of VRAM. It’s ideal for privacy-focused users, but limited hardware may restrict what models you can use.
Does PandasAI run locally?
Yes. In this guide, PandasAI connects to a locally running model through Ollama using PandasAI’s LocalLLM, so all analysis happens on your device without cloud services.
Why use Ollama over ChatGPT?
Ollama lets you run language models locally on your own device, so your data never leaves your system. Unlike ChatGPT, which relies on cloud servers, Ollama gives full control over privacy and works even without an internet connection. It’s ideal for users who want a secure, self-contained AI setup.
Is Ollama a generative AI?
Ollama itself isn’t a generative AI model; it’s a local platform that lets you run and interact with generative AI models such as Llama 3 directly on your device. It simplifies setup and makes testing or using these models possible without cloud connections.
Is Ollama completely free?
Yes. Ollama is a free and open-source platform that lets you download and run AI models locally. There are no usage fees or subscriptions, and all processing happens on your device without cloud costs.
- For any inquiries, contact me here.
- Explore more tutorials and guides in the Blog section.
- For definitions of key terms, refer to our glossary post here.

